Automated transfer of datasets from local computer to Amazon Redshift with ETL steps
Purpose:
Establish an automated pipeline that picks up a dataset from a directory in a local machine, move it to S3 bucket, conduct ETL and load it to Redshift Data Store to access it through SQL Workbench for data analytics and machine learning
Prerequisites:
AWS Account, Installed SQL Workbench, Understanding of: ETL methodology, PySpark, Python, Basic Network Configuration, Downloaded files from folder ‘Project 2’ in GitHub link provided: https://github.com/Myself1214/Upwork.git
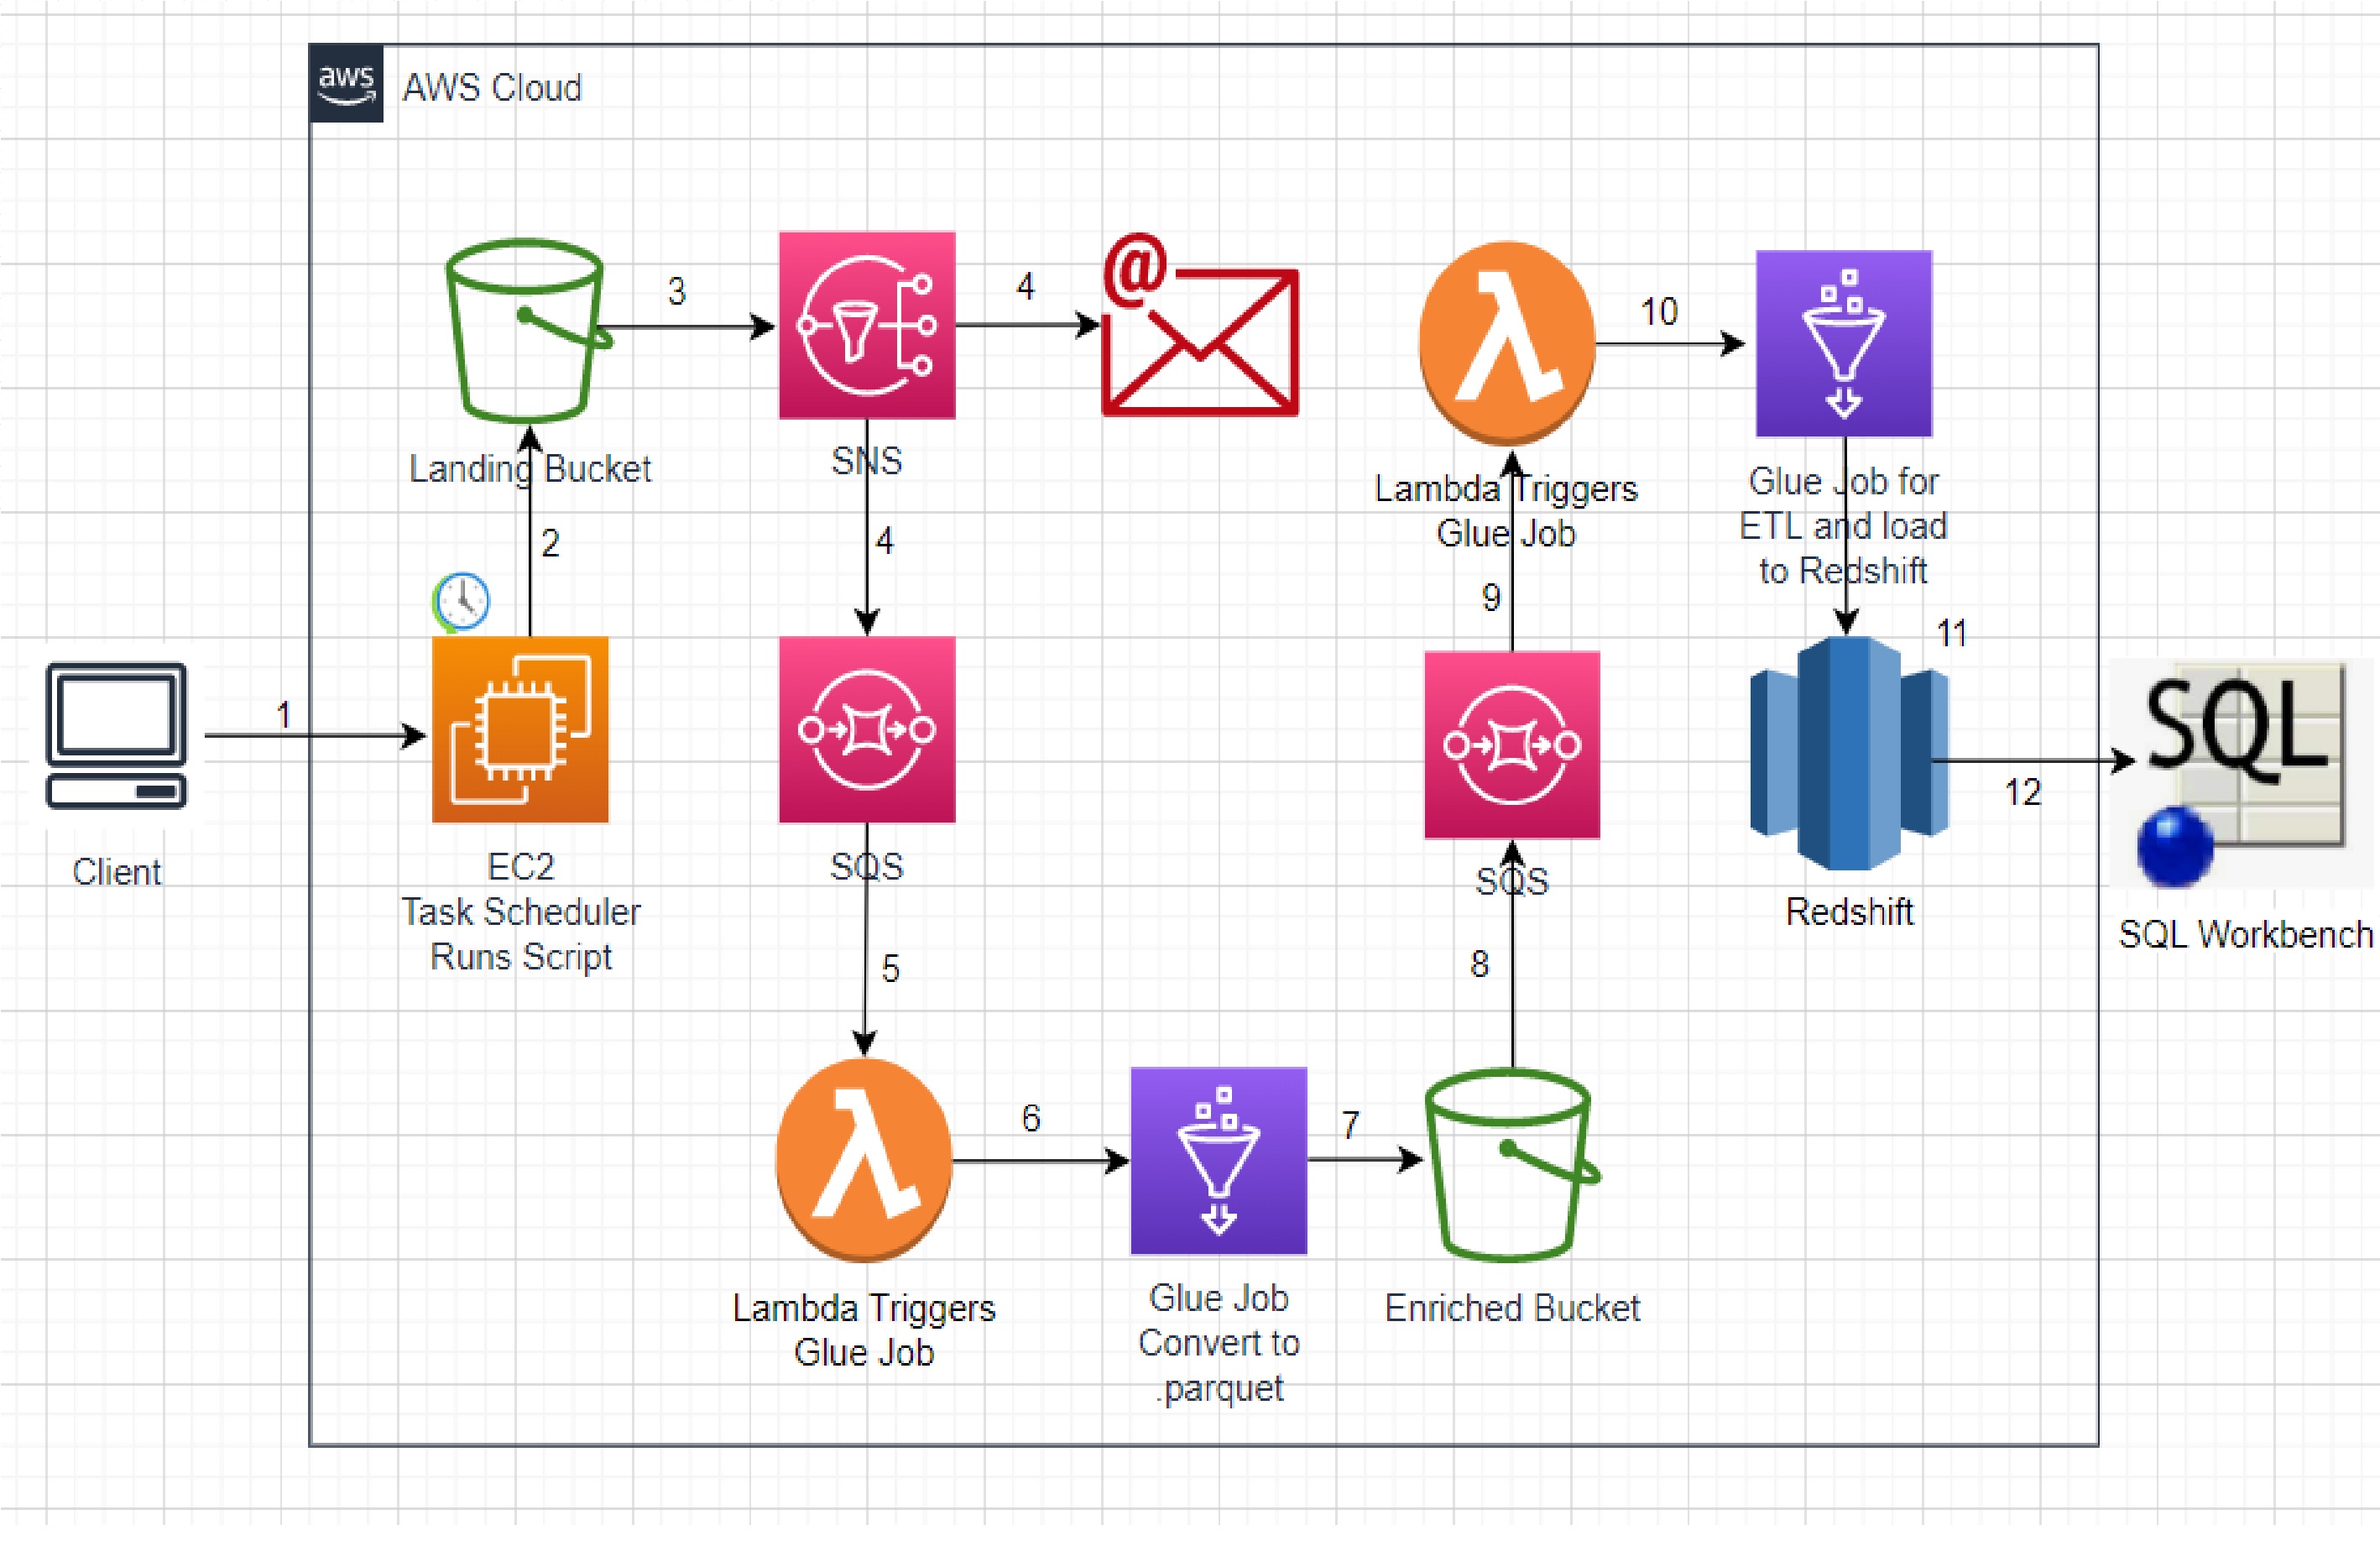
Workflow Diagram:
Take a quick look at Work Flow Diagram to get hight level picture of work to be done

Plan of Work (Pseudo Work):
- Create two S3 buckets: Raw bucket and Enriched bucket
- Create Security Group to be used by all resources
- Create an EC2 Windows server and mount a directory from the local machine on EC2 to be able to read local files on EC2 synchronously.
- Create a script to move the dataset from EC2 server to S3 Raw bucket and put it on a daily execution schedule
- Create IAM roles to be used by glue jobs, redshift cluster, lambda, sns and sqs
- Create a Glue Job to convert data from Raw bucket to .parquet format and move it to S3 Enriched bucket.
- Create SNS topic and configure S3 Raw bucket to send events to SNS topic when files appear in Raw bucket and, also, subscribe email address to SNS topic to receive notification when files appear in Raw bucket
- Create SQS and subscribe it to SNS topic to establish massage queue system to prevent possible message loss that may happen with asynchronous event reporting method
- Create Lambda Function and add code to trigger Glue Job (created in step 3) when Lambda executes. Add SQS (created in step 5) as Lambda’s trigger
- Create a Redshift Cluster with loaded sample database
- Create another Glue Job (Enriched and load job) to read data from Enriched bucket, clean, transform and load it to a database within Redshift Data Store.
- Create another SQS and configure S3 Enriched bucket to send events to SQS when trigger file appears in Enriched bucket
- Create another Lambda Function and add code to trigger Glue Job (created in step 10) when Lambda executes. Add SQS (created in step 11) as Lambda’s trigger
- In SQL Workbench create connection to Redshift Data Store and query loaded dataset to validate it is present in Redshift
Actual Steps:
- Creating S3 Buckets.
- Create Security Groups
- Lunch EC2 Instance.
- Mounting the local folder as a disk drive to ec2. To do it, we will need to create a disk drive pointing at shared folder
- Install AWS Command Line Interface on your EC2.
- Enable Network Discovery on your EC2.
- Create .bat file to sync files in the mounted folder on EC2 and S3 raw bucket.
- Create a task on Windows task scheduler to run s3_sync.bat file on a daily basis.
- Create IAM roles for glue job to access s3 buckets, redshift, run sql queries and IAM pass role and another IAM role for lambda to start glue job and to report logs to CloudWatch
- Create SNS topic and configure s3 Raw Bucket to send ‘put object’ events to SNS topic.
- Create a SQS queue and subscribe it to SNS topic and also subscribe email to SNS topic.
- Create a glue job to partition raw bucket data, convert it to .parquet format and load it to the enriched bucket.
- Create Lambda function to trigger raw-to-enriched.gljob and set SQS queue created in step 10 to trigger this Lambda function.
- Create another SQS to receive ‘put object’ event notifications from S3 enriched bucket.
- Create a Redshift cluster with a sample database, set up VPC S3 Endpoint
- Now we need to create a glue connection to the redshift database to allow glue job to use it as a channel to write data to the redshift database.
- Create another glue job to do data transformation and load it to the redshift sample database as a table.
- Create Lambda function to trigger to-redshift-gljob glue job and set SQS queue created in step 13 to trigger this Lambda function
- In AWS, log in to S3 Console. Click on ‘Create Bucket’, give the bucket name ‘Raw’ bucket
- scroll down and click on ‘Create bucket’. Repeat again for the ‘Enriched’ bucket. Repeat again for the ‘tooling’ bucket.
- navigate to EC2 Console, scroll down and select Security Groups section in the left pane
- click ‘Create security group’, give it a name of your choice
- under Inbound rules select ‘Add rule’: for type ‘RDP’, for source ‘My IP’
- add another rule: for type ‘HTTPS’, for source ‘My IP’
- add another rule: for type ‘Redshift’, for source ‘Anywhere IPv4’
- under Outbound rules, add rule: for type ‘All traffic’, for source ‘Anywhere IP4V’.
- scroll down and click ‘Create Security Group’
- open previously created security group and add another inbound rule: for type ‘All TCP’, for source select this security group’s name from the list. Save changes
- navigate to EC2 Console, Click on ‘Lunch instance’, give it a name of your choice
- under AMI section choose Windows image
- under Key Pair section select ‘Create new key pair’ and follow directions to save you key pair file and select this key pair from the drop down list
- under network settings section choose ‘Select existing security group’ and choose previously created security group
- scroll all the way down and click ‘Launch Instance’
- create folder in a directory of your choice in your local machine
- open file ‘to turn folder into disk drive.txt’ from GitHub link provided above and update it with your details as instructed
- copy and run this code in CLI of your choice. You should see a new drive created in your machine
- connect to your ec2 instance by selecting it in AWS console, click connect on top right, select RDC, click on ‘decrypt password’, select ‘browse’, choose ‘Key pair’ file you created when launching your ec2 instance, click on ‘decrypt’
- open Remote Desktop Client app on your local machine and input connection details from ec2 console. Click on ‘show options’, select ‘Local Resources’ tab on top, click on ‘more’, under drives select your newly created drive. Connect to ec2
- Open Command Prompt within your EC2, enter following command and follow instructions to install AWS CLI: msiexec.exe /i https://awscli.amazonaws.com/AWSCLIV2.msi
- On your EC2 navigate to Network => Properties => Change Advanced Sharing Settings => Turn On Network Discovery and save changes
- open file s3_sync.bat downloaded from GitHub link, adjust it with your account details, disk drive letter and S3 raw bucket path and save
- place this s3_sync.bat file on your shared folder in your local machine. It should show up in your EC2 instance under \\tsclient\ path. Move this file to another location of your choice within your EC2 file system
- Instructions on how to create task can be found here: https://techdirectarchive.com/2020/03/24/how-to-create-a-scheduled-task-on-windows-server-2019/
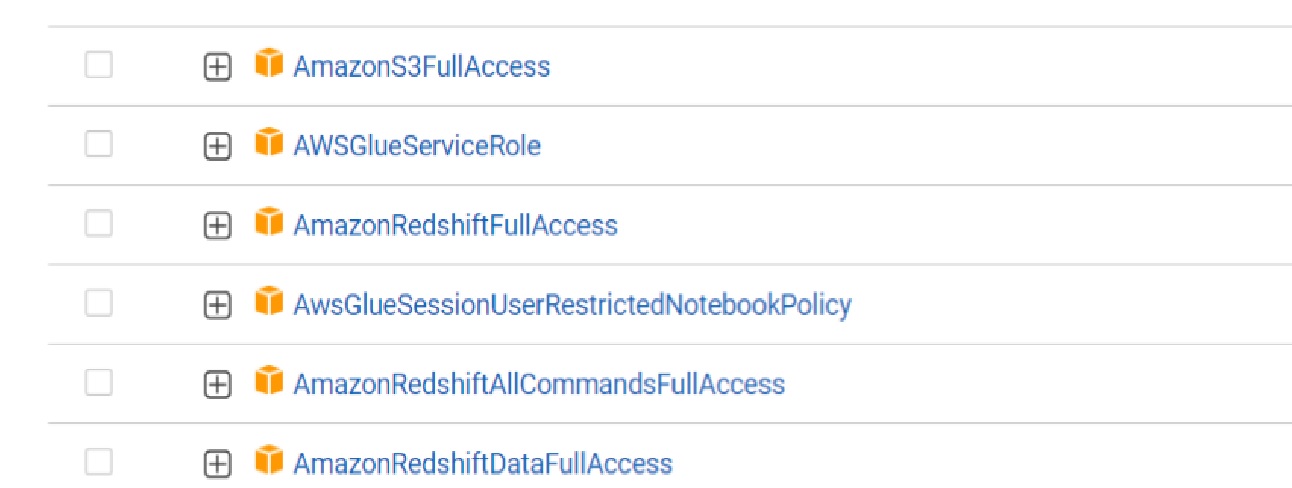
- Log in to IAM console. Select ‘Roles’, then select ‘Create Role’.Under ‘Trusted Entity type’ select ‘AWS Service’, under “use case’ select ‘Glue’ an click ‘Next’. Add following permissions:

Also, add an ‘Inline policy’, select ‘JSON’ tab and add json string from PassRole.json file provided in GitHub link. Finish creating this role.
- On IAM console create another role. Under ‘Trusted Entity type’ select ‘AWS Service’, under “use case’ select ‘Lambda’ an click ‘Next’. Add following permissions::

- on the SNS console, select ‘Topics’, then select ‘Create topic’. Select ‘Standard’ for type, provide name for topic and create topic.
- once a topic is created, open it and click on ‘Edit’. Navigate to the ‘Access policy’ section and replace the json string with the one provided in the ‘sns-policy.json’ file from GitHub. Before replacing the json string remember to insert your ARN details in ‘sns-policy.json’ file. Save changes. This way you are allowing S3 bucket to publish messages to your SNS topic.
- Navigate to the S3 console, select your raw bucket, and create a new folder called ‘trigger-file’. Then select ‘Properties’ and navigate to the ‘Event Notifications’ section. Click on ‘Create event notifications’, provide name, enter folder name under ‘Prefix’ section, then select ‘All object create events’ under ‘Object creation’ section. Scroll down and under the 'Destination' section select ‘SQS queue’ and from the drop down menu below select your SNS topic created earlier and save changes. This way we set up raw bucket to send event notifications to SNS topic once a new object has been created.
- log in to SQS console, select ‘Create queue’. Provide name, scroll down and ‘create queue’.
- once SQS queue is created, switch to SNS console, under ‘Topics’ section select SNS topic created earlier, select ‘Create subscription’, under ‘Protocol’ select ‘Amazon SQS’ and under ‘Endpoint’ select your SQS created earlier and create subscription.
- repeat previous step for email subscription by selecting ‘Email’ under ‘Protocol’ and providing valid email for ‘Endpoint. You’ll need to confirm the subscription from your email.
- log in to the AWS Glue console. Select ‘Jobs’ on the left pane. Under ‘Create job’ select ‘Spark script editor’ and click on ‘create’.
- delete the prefilled code then copy code from ‘raw-to-enriched-gljob.py’ from GitHub and paste it as your script.
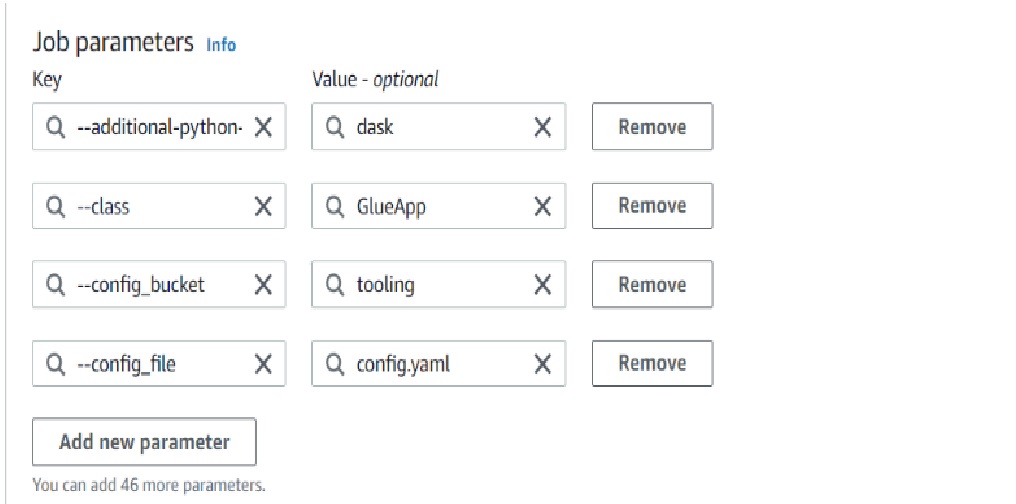
- navigate to ‘Job details’ tab, change name to ‘raw-to-enriched.gljob’, under ‘IAM-Role’ select glue job role created in step 8, for ‘Number of retries’ change to ‘0’, open ‘Advanced properties’ section and under ‘Job parameters’ section enter following details:

then scroll all the way up and click on ‘Save’. (Note: it’s --additional-python-modules)
- log in to the Lambda console. Select ‘Functions’ on left pane and then click on ‘Create function’. Leave ‘Author from scratch’ selected, provide function name, under ‘Runtime’ select ‘Python 3.9’. Expand ‘Change default execution role’ and select ‘Use an existing role’ and from the menu select the IAM role created for Lambda in step 8. Finish creating function.
- once a function is created, scroll down and select the ‘Code’ tab, delete all default code and replace it with the code from ‘lambda-code-trigger-glue-job.py’ file from github adjusting default glue job name to your glue job name and click on ‘Deploy’. After, click on ‘Test’, provide a name for the test event and save.
- select the ‘Configuration’ tab and choose ‘triggers’ then click on ‘Add trigger’. Under ‘Trigger configuration’ choose ‘SQS’ and unde ‘SQS queue’ select SQS created in step 10. Scroll down and click ‘Add’. You should see the SQS trigger added next to the functions name on top of the screen.
- repeat instruction on step 10, however, only to create another SQS without subscribing it to SNS.
- once SQS is created, open it and navigate to ‘Access policy’ tab, click on ‘Edit’ and under the ‘Access policy’ section replace the current json string with the content of the ‘SQS access policy.json’ file from GitHub following instructions provided inside the file and save the changes. This wy we allowing s3 bucket to send event to this SQS.
- log in S3 console, open the ‘Enriched’ bucket, select the ‘Properties’ tab and navigate to ‘Event notifications’ section and click on ‘Create event notification’. Provide a name, then under ‘Event types’ select ‘All object create events’ for ‘Object creation’ Scroll down and choose ‘SQS’ for ‘Destination’ and select SQS created in step 13 from drop down menu. Save changes.
- log in to the Redshift console, select clusters on the left pane and click on ‘Create cluster’. Change cluster name to one of your choice under ‘’Cluster identifier’, select ‘Free trial’, scroll down and provide your username and password and click on ‘create cluster’
- once the cluster is created and available, open it and navigate to the ‘Properties’ tab. Under ‘Network and security settings’ section click on ‘Edit’. Under ‘VPC security groups’ delete default security group and from drop-down menu choose security group created in step 2. and save changes. This will allow connection on resource level for our cluster.
- once changes are saved and the cluster available (takes a couple of minutes), open cluster again and ‘Actions’ tab select ‘Modify public accessibility settings’ and change it to ‘Enable’ and save changes. This will allow us to connect to the Redshift database from an external source like SQL workbench, having a security group already configured.
- now, we need to allow connections between glue job and our VPC where our redshift cluster resides since glue job will be transferring data from Amazon S3 to a resource in our VPC - redshift cluster. To do this we need to create a VPC S3 Gateway Endpoint.
- log in to the VPC console. On the left pane select ‘Endpoint’, and click on ‘Create endpoint’. Give it a name, for ‘Services’, add the filter ‘Type: Gateway’ and select ‘com.amazonaws.region.s3’. For ‘VPC’ select VPC in which the redshift cluster resides (default VPC). Put a checkmark on route table provided, Scroll down and click on ‘Create endpoint’
- log in to the Glue console, select ‘Connectors’ from the left pane, under ‘Connections’ section click on ‘Create connection’. Provide it a name, for ‘Connection type’ select ‘Network. Under ‘Network options’ section, for ‘VPC’ select VPC in which redshift cluster resides in, for ‘Subnet’ select any subnet associated with redshift VPC, and for ‘Security group’ select security group created in step 2 and click on ‘Create connection’
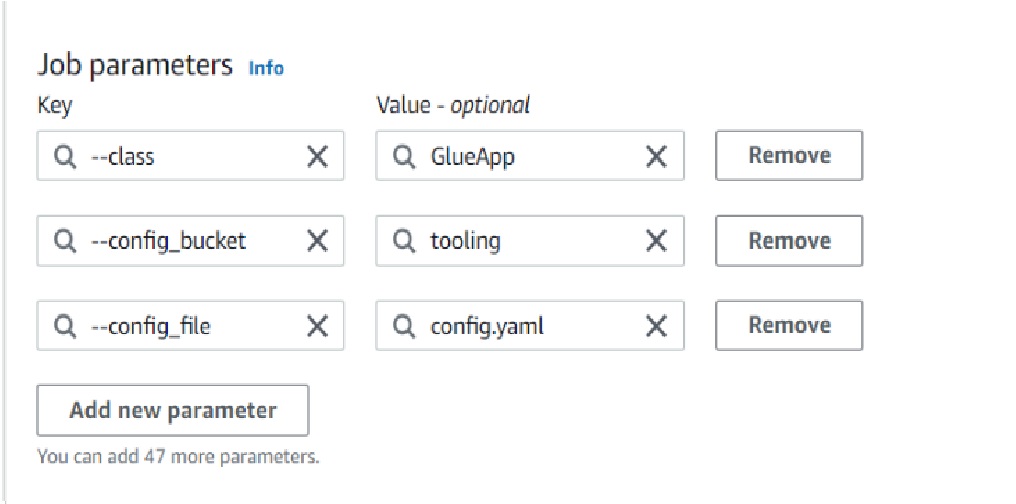
- repeat steps for glue job creation provided in step 11, except, use code from ‘to-redshift gljob.py’, change glue job name to ‘to-redshift-gljob’ and under ‘Job parameters’ add:

- under the ‘Job details’ tab navigate to ‘Connections’ section and select the glue connection created in step 15 from the drop-down menu. Scroll all the way up and save the glue job.
- Follow instructions provided in step 12 for Lambda creation. Use SQS created in step 13 and in the code adjust glue job name to to-redshift-gljob’
Now is the time to test our pipeline with small version of our dataset (about 40 mb), once it runs successful and we validate data in Redshift database, then we will run full dataset size (about 700 MB).
- Download ‘config.yaml’ file from GitHub and fill in all the values from your aws resources created:
- Gather username, password and url - from your redshift cluster details,
- db_table - set a name of your choice
- source_file_bucket - name of your raw S3 bucket
- file path - path inside raw S3 bucket where you’ll upload your dataset (path ends with your dataset name and extension’
- trg_file_bucket - your enriched S3 bucket (in format that is mentioned)
- Navigate to the S3 console, select the ‘tooling’ bucket, upload the ‘config.yaml’ file you adjusted.
- Upload file ‘911_Calls_for_Service_(Last_30_Days).csv’ to your desired path inside S3 raw bucket.
This should trigger the pipeline and we can validate it by checking current run status of your glue jobs, checking inside your enriched bucket for data partitions to show up and finally querying Redshift database with SQL workbench or through Redshift Query Editor on Redshift Console.